Welcome to the enchanting world of winter sowing, where the magic of gardening meets the crisp embrace of cold season! Winter sowing is the secret key to unlocking a whole new dimension of plant-growing pleasure. In this blog, explore why winter sow seeds works and why it's the perfect way to transform your winter blues into a vibrant spectrum of greens.
So, why embrace winter sowing? Well, it's not just about defying the frosty odds; it's about tapping into the unique benefits that cold weather brings to the gardening table. Winter sowing mimics the conditions seeds encounter in the wild, paving the way for robust and resilient plants. In this journey we'll unravel the mysteries of, creating a cozy winter haven for your budding greens.
Ready to embark on a hardy gardening adventure? Let's explore how winter sowing can turn your winter garden dreams into a reality!
What is Winter Sowing?
Winter sowing seeds is a gardening method that capitalizes on the natural cycles of winter. Unlike traditional gardening, where seeds are sown in spring, winter sowing seeding involves starting seeds outdoors during the winter months. The seeds sprout as the warm weather starts, mimicking the conditions they would experience in their natural habitat.
The magic of winter sowing lies in its ability to leverage the cold to promote a gradual and natural stratification process. Stratification is a cold treatment that breaks seed dormancy, allowing for better germination when the weather warms up. Winter sowing taps into this natural process, giving your plants a head start and ensuring robust growth once spring arrives.
Different Methods of Winter Sowing
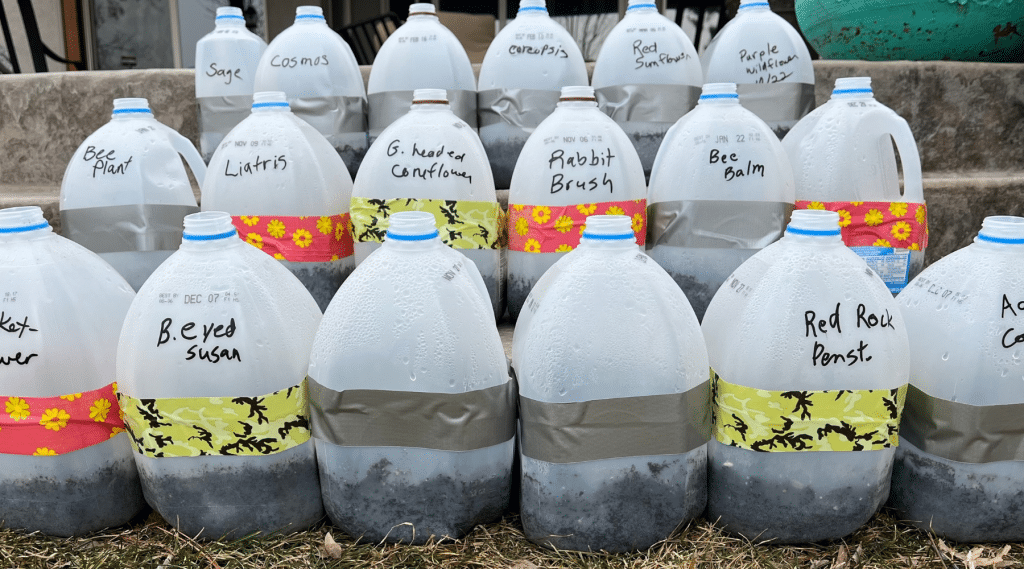
1. Milk Jug Method:
- Materials: Clean, translucent plastic milk jugs, scissors or a utility knife, tape or zip ties.
- Procedure: Cut a milk jug horizontally, leaving a small hinge on one side. Create drainage holes in the bottom, fill with potting mix, sow seeds, label, and secure the jug with tape or zip ties. Ventilate as needed. (see more detailed instructions below)
2. Plastic Container Method:
- Materials: Clear or translucent plastic containers (like those for salads or bakery goods), scissors or a utility knife, tape or zip ties.
- Procedure: Similar to the milk jug method, cut the container, create drainage holes, fill with potting mix, sow seeds, label, and secure the lid with tape or zip ties.
3. Seed Trays or Seed Flats:
- Materials: Plastic or wooden seed trays or flats, clear plastic wrap or a plastic lid, potting mix.
- Procedure: Fill seed trays with potting mix, sow seeds, water, and cover with clear plastic wrap or a plastic lid. Place the tray outdoors, and when seedlings emerge, gradually expose them to outdoor conditions and transplant.
4. Winter Sowing in Mini-Greenhouses:
- Materials: Transparent plastic storage containers with lids, starting mix, seeds.
- Procedure: Fill the containers with high quality starting mix, sow seeds, water, and secure the lid. The container acts as a mini-greenhouse. Once seedlings are strong enough, transplant them outdoors.
5. Direct Sowing in the Garden:
- Materials: Suitable seeds for direct sowing, prepared garden beds.
- Procedure: Sow seeds directly in the garden soil. This method is suitable for cold-tolerant plants that benefit from winter stratification.
6. Winter Sowing in Biodegradable Pots:
- Materials: Biodegradable pots or seed starting pots, seed starting mix, seeds.
- Procedure: Fill pots with potting mix, sow seeds, water, and place the pots outdoors. As the seedlings grow, transplant them along with the biodegradable pots into the garden.
7. Winter Sowing in Soil Blocks:
- Materials: Soil block maker, seed starting mix, seeds.
- Procedure: Use a soil block maker to create soil blocks, sow seeds in each block, water, and place the blocks outdoors. Transplant the soil blocks, along with the seedlings, into the garden when they're ready.
Experiment with different methods to find the one that suits your gardening preferences and the needs of the plants you are growing. Each method has its advantages, and winter sowing is a flexible technique that allows you to start seeds outdoors with minimal equipment.
How to Winter Sow Seeds in Milk Jugs
Using milk jugs is a cost-effective and straightforward winter sowing technique to start seeds outdoors. The translucent plastic of the milk jug acts like a mini-greenhouse, creating a protected environment for seeds to germinate during the winter. Here's a step-by-step guide on how to start winter sowing jug:
Materials Needed:
- Milk Jugs: Empty, clean, and translucent plastic milk jugs. One jug can be used for each type of seed or plant.
- Cutting Tool: Scissors or a utility knife for cutting the milk jugs.
- Labels: Markers or labels to identify the seeds or plants.
- Potting Mix: High-quality seedling starting mix or a mix of potting soil and vermiculite.
- Seeds: Choose seeds that are suitable for winter sowing, such as cold-stratified or hardy varieties.
- Tape or Zip Ties: To secure the milk jug caps or create hinges for easy access.
Steps:
Prepare Milk Jugs:
Clean and sanitize the milk jugs, removing any labels. Cut the jug horizontally, leaving a small hinge on one side. This hinge will act as a connection between the top and bottom parts.
Create Drainage Holes:
Make several drainage holes in the bottom of the jug to prevent waterlogging. Use a sharp tool or hot nail to create small holes.
Fill with Seed Starting Mix:
Add your potting mix into the bottom part of the jug, leaving some space at the top. Moisten the mix with water.
Sow Seeds:
Plant the seeds according to the recommended depth on the seed packet. Space them appropriately to allow for growth.
Label the Jug:
Clearly label each jug with the type of seeds and the date of sowing. This is crucial for organization.
Secure the Jug Caps:
Close the jug and secure the caps with tape or zip ties. If using tape, it's a good idea to create a hinge with the tape so you can open the jug for ventilation.
Create Ventilation Holes:
Use a knife or scissors to make small ventilation holes in the top of each jug. This helps regulate temperature and humidity inside the jug.
Place Outdoors:
Position the jugs outdoors in a location that receives natural light. South-facing areas are generally ideal.
Monitor and Water:
Check the water jugs regularly for moisture. Water if the soil appears dry. The closed jugs create a self-watering effect, but monitor to ensure consistent moisture.
Open for Ventilation:
On warmer days, open the cap or hinge to allow for ventilation and prevent excessive heat buildup.
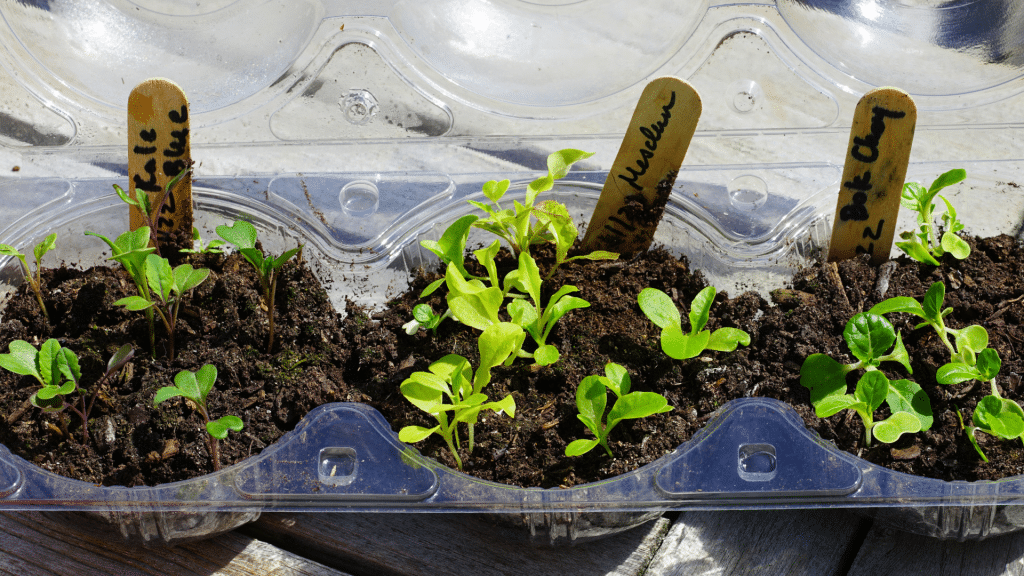
Transplant Seedlings:
Once the weather warms up and seedlings are strong enough, transplant them into your garden or larger pots.
Tips for Winter Seed Sowing:
Choose Cold-Tolerant Seeds: Opt for seeds that can withstand cold temperatures and benefit from the winter stratification process.
Check Local Frost Dates: Be aware of your local frost dates to ensure you start winter sowing at the right time for your region.
Protect from Extreme Conditions: If there's an unseasonably warm period, be prepared to open the jugs for ventilation, and conversely, protect seedlings from late frosts.
Troubleshooting Common Issues
- Poor Germination: This might be due to too much or too little moisture, or the seeds may require a different stratification process.
- Mold Growth: Ensure adequate ventilation and avoid overwatering.
- Seedling Legginess: Position containers where they receive ample light once seedlings sprout.
How to Choose Seeds for Winter Sowing
Choosing the right seeds for winter sowing is a crucial step in ensuring a successful and vibrant cold-weather garden. Here's a guide to help you select seeds that thrive in winter conditions:
1. Cold-Hardy Varieties:
Opt for seeds of plant varieties known for their cold-hardiness. Look for terms like “winter-hardy,” “cold-resistant,” or “frost-tolerant” on seed packet.
2. Hardy Perennials and Biennials:
Choose seeds of perennial and biennial plants. These plants are naturally adapted to withstand winter conditions and will often benefit from the cold stratification provided by winter sowing.
3. Native Plants:
Consider sowing seeds of native plants. Indigenous species are well-suited to the local climate and are more likely to thrive in your specific winter conditions.
4. Cool-Season Vegetables:
Include cool-season vegetables in your selection, such as kale, spinach, carrots, and radishes. These crops are adapted to lower temperatures and can flourish in the cool environment provided by winter sowing.
5. Herbs:
Many herbs are well-suited for winter sowing. Choose herbs like thyme, sage, and rosemary, which can withstand colder temperatures.
6. Flowering Shrubs and Trees:
Explore flowering shrubs and trees that are suitable for winter sowing. These can add structure and beauty to your garden even in the colder months.
7. Winter Annuals:
Some plants are specifically labeled as “winter annuals” and are bred to thrive in cooler temperatures. Consider these for a burst of color during the winter months.
8. Check Seed Packet for Instructions:
Read the information on seed packets. Look for guidance on the ideal planting times, temperature requirements, and any specific instructions for winter sowing.
9. Research Growth Requirements:
Understand the growth requirements of the plants you're interested in. Consider factors such as sunlight, soil type, and moisture levels to ensure compatibility with your garden conditions.
10. Experiment with Varieties:
Embrace the winter season of experimentation by trying a variety of seeds. Mix in some familiar favorites with a few new and exciting options to see what thrives in your winter garden.
11. Consider Microclimates:
Evaluate microclimates within your garden. Different areas may have slightly different temperature and sunlight conditions. Tailor your seed selection to match these microclimates.
12. Seed Viability:
Ensure that the seeds you choose are fresh and viable. Check the expiration date on seed packets and consider germination tests for older seeds.
Perennial Seeds That Work Well for Winter Sowing
Black-Eyed Susan: These cheerful, yellow flowers are drought-tolerant and attract pollinators.
Coneflowers: Known for their vibrant purple or pink daisy-like blooms, coneflowers are drought-resistant and great for attracting butterflies.
Lupine: Lupines produce tall spikes of colorful flowers in various shades. They're a favorite for cottage gardens.
Bee Balm: With unique, spiky flowers, bee balm attracts pollinators and adds a burst of color to the garden.
Blanket Flower: Drought-tolerant and easy to grow, blanket flowers feature red and yellow blooms resembling a Native American blanket.
Coreopsis: These bright, daisy-like flowers are drought-tolerant and come in various colors, adding a sunny touch to the garden.
Milkweed: Essential for monarch butterflies, milkweed varieties are perennial and come in different species with varying flower colors.
Shasta Daisy: The classic white daisy-like flowers of Shasta daisies are a staple in many gardens.
Sedum: Known for their fleshy leaves and late-season bloom, sedums are low-maintenance perennials.
Yarrow: Yarrow produces flat clusters of flowers in various colors and is known for its feathery foliage.
Hardy Annuals for Winter Sowing
Poppies: Many poppy varieties are hardy annuals with delicate, papery flowers. Iceland poppies are a popular choice.
Calendula: Also known as pot marigold, calendula produces bright orange or yellow flowers and has medicinal properties.
Larkspur: Larkspur adds vertical interest with its spiky flowers in various shades. It's a cousin of the delphinium.
Nigella: Commonly known as Love-in-a-Mist, nigella produces intricate flowers surrounded by feathery foliage.
Snapdragon: Snapdragons come in a range of colors and heights, adding a vertical element to the garden.
Alyssum: Sweet Alyssum is a fragrant, low-growing annual that works well as a ground cover or in containers.
Bachelor's Button: With vibrant blue flowers, Bachelor's Button is a charming and easy-to-grow annual.
Cornflower: The cornflower's striking blue color and feathery foliage make it a favorite in wildflower mixes.
Love Lies Bleeding: This unique annual has long, drooping flower heads and adds a touch of drama to the garden.
Cosmos (Cosmos bipinnatus): Cosmos are easy-to-grow annuals with feathery foliage and daisy-like flowers in various colors.
When choosing seeds for winter sowing, consider your local climate and the specific requirements of each plant. Additionally, check seed packets for information on cold stratification and whether the seeds are suitable for direct sowing outdoor
Winter Sown Vegetable Seeds For Early Spring
These winter sowed seeds are selected for their ability to withstand colder temperatures and thrive with the winter stratification process, offering a jumpstart on the growing season and an early harvest of fresh, home-grown produce in the spring.
Spinach: Winter-sown spinach provides an early spring harvest of nutritious, tender leaves that are excellent for salads, smoothies, or cooked dishes.
Kale: Hardy and cold-resistant, winter-sown kale yields vibrant leaves that are perfect for salads, stir-fries, and soups. It's a nutrient-packed green.
Lettuce: Certain cold-tolerant lettuce varieties are great for winter sowing, ensuring a fresh and crisp supply for salads in early spring.
Swiss Chard: Winter-sown Swiss chard produces colorful stems and large, tender leaves, adding both beauty and nutrition to your garden and meals.
Radishes: Quick-growing and well-suited for winter sowing, radishes add a peppery crunch to salads and are among the first vegetables ready for harvest in spring.
Carrots: Winter-sown carrots result in sweet and crunchy roots perfect for fresh snacking, salads, or as a delicious addition to various dishes.
Peas: Cold-tolerant sweet peas can be sown early in the year using the winter sowing method, providing sweet and tender pea pods for fresh consumption.
Broccoli: Winter-sown broccoli provides compact, green heads in early spring, offering a versatile and nutritious addition to your culinary creations.
Cauliflower: Certain cauliflower varieties are suitable for winter sowing, producing early spring heads that are perfect for roasting, steaming, or including in various dishes.
Cabbage: Cold-tolerant cabbage varieties can be started through winter sowing, yielding crisp heads for coleslaw, stir-fries, and other culinary uses.
How long will it take a winter sown seedling to germinate?
The germination time for winter-sown seedlings can vary significantly depending on several factors, including the type of seed, the specific conditions of the winter season, and the USDA hardiness zone where you're gardening. Unlike traditional indoor seed starting, where germination times can be more predictable due to controlled conditions, winter sowing relies on the natural cycles of the environment, which can lead to variability.
Type of Seed: Different species of plants have varying germination requirements and timelines. Some seeds, especially those of cold-hardy plants, may germinate quickly once the conditions are right, while others might take longer. Seeds that require cold stratification will only begin to germinate after they have been exposed to cold temperatures for a certain period.
Winter Conditions: The specific weather patterns of a particular winter will influence germination times. In a colder and longer winter, seeds might remain dormant longer and germinate later in the spring. Conversely, in a milder winter or in warmer hardiness zones, seeds may germinate earlier.
USDA Hardiness Zone: In colder zones (like 3 or 4), germination might not occur until late spring when the soil has warmed sufficiently. In warmer zones (like 7 or 8), germination might occur earlier in the spring as the ground thaws sooner.
In general, winter-sown seedlings may start germinating as early as late winter or early spring, but some might not germinate until mid to late spring. It's important to remember that winter sowing is a process that aligns with nature's timing – seeds will germinate when the conditions are right for them. Patience is key, as some seeds may surprise you by sprouting later than you expect.
What zone is winter sowing in?
Winter sowing can be practiced in various USDA hardiness zones, but it is particularly effective in zones with cold winters where temperatures fluctuate around freezing for extended periods. This method is commonly used in zones 3 through 8, where winter conditions provide the necessary cold stratification for many seeds.
Gardeners take advantage of the natural freeze-thaw cycles to break seed dormancy, a process that many perennial, tender annuals, and vegetable seeds require for germination in this zone. In zones with milder winters, such as zones 9 and above, winter sowing might still be possible, but the range of suitable plants may be different since these areas don't experience the prolonged periods of cold required by some seeds.
In the coldest zones (1 and 2), winter conditions can be too harsh for winter sowing to be effective for most plants, although some very hardy species might still be sown in this way.
Winter Sowing Calendar For Zone 3-8
Creating a winter sowing schedule depends on the specific hardiness zone you are in. The United States is divided into USDA hardiness zones, which are determined by average annual minimum winter temperatures. Here's a general guide for winter sowing calendar based on USDA hardiness zones:
Winter Sowing Zone 3
Sowing Timeframe: December to January
Plants for Winter Sowing:
- Perennials like echinacea, astilbe, and lupines, which require cold stratification.
- Hardy vegetables such as kale, collards, and Brussels sprouts.
- Native flowers that are adapted to cold climates.
Winter Sowing Zone 4
Sowing Timeframe: December to early February
Plants for Winter Sowing:
- Cold-tolerant perennials like daylilies, delphiniums, and peonies.
- Hardy vegetables such as broccoli, cabbage, and cauliflower.
- Hardy annuals like pansies and snapdragons.
Winter Sowing Zone 5
Sowing Timeframe: Late December to February
Plants for Winter Sowing:
- Perennials like black-eyed Susan, phlox, and hostas.
- Hardy annuals such as larkspur, calendula, and poppies.
- Vegetables like spinach, peas, and radishes.
Winter Sowing Zone 6
Sowing Timeframe: January to early March
Plants for Winter Sowing:
- Hardy herbs like parsley and cilantro.
- Perennials such as lavender, salvia, and yarrow.
- Vegetables like lettuce, beets, and carrots.
Winter Sowing Zone 7
Sowing Timeframe: January to mid-March
Plants for Winter Sowing:
- Perennials like coneflowers, Russian sage, and coreopsis.
- Cool-season vegetables such as Swiss chard, turnips, and onions.
- Hardy annuals including sweet peas and bachelor's buttons.
Winter Sowing Zone 8
Sowing Timeframe: Early February to late March
Plants for Winter Sowing:
- Perennials like verbena, hollyhocks, and sedum.
- Early-sowing vegetables like collards, kale, and arugula.
- Hardy flowers such as cosmos, zinnias, and marigolds.
Remember, this is a general guide, and local conditions can vary. Always check specific plant recommendations and local weather forecasts. You can start winter sowing vegetables and herbs If you are in warmer gardening zones, you can bump your winter sowing up a few weeks and even start as early as the winter solstice.
How to Protect Winter Sown Seeds
Protecting winter-sown seeds is crucial to ensure their successful germination and growth during the colder months. Here are some tips to help you protect your winter-sown seeds:
Mulching:
Apply a layer of mulch over the sown area to provide insulation and protect the seeds from extreme temperature fluctuations. Mulch helps regulate soil temperature and moisture, creating a more stable environment for germination.
Row Covers:
Use row covers or frost blankets to shield the seedbed from cold temperatures and harsh winds. These covers trap heat and create a microclimate that is more favorable for seed germination.
Cold Frames:
Consider using cold frames to provide additional protection. These structures act like mini greenhouses, capturing sunlight and warmth to create a sheltered environment for the seeds.
Cloches:
Individual cloches or protective covers can be placed over specific seedlings to shield them from the elements. These can be made from materials like plastic or glass.
Watering:
Keep the soil consistently moist but not waterlogged. Adequate moisture is essential for germination, and it also helps protect the seeds from drying out in the cold.
Monitor Weather Conditions:
Stay informed about upcoming weather conditions. If an unexpected frost is predicted, take proactive measures to protect the seeds, such as covering them with blankets or moving containers indoors.
Monitor Moisture Levels:
Keep the soil consistently moist, as adequate moisture is essential for germination. Check the moisture levels regularly and water when needed, especially during dry periods.
Ventilation:
If using cold frames or covers, ensure proper ventilation during sunny days to prevent overheating. This can be achieved by partially opening covers or using adjustable ventilation panels.
Use Appropriate Fertilizer:
Consider using a slow-release fertilizer that will provide nutrients to the seeds gradually over the winter months, promoting healthy growth when conditions improve.
Pest Control:
Keep an eye out for pests that might be active during winter. Slugs and certain insects can still pose a threat, so take measures to protect your seeds from these potential invaders.
Plan for Spring Transition:
Be prepared for the transition from winter to spring. Gradually remove protective covers and introduce the seedlings to outdoor conditions to prevent shock.
How to Transplant Winter Sown Seeds
Transplanting winter sown seeds successfully into your garden is a crucial step in ensuring the growth and health of the plants you have carefully nurtured through the colder months. This guide will walk you through the process of transplanting these seedlings, ensuring they thrive in their new environment.
1. Timing is Key
Assess the Weather: The right time to transplant is after the last frost date in your area. Seedlings need a stable, frost-free environment to thrive.
Observe Seedling Development: Look for true leaves (the second set of leaves that appear after the initial sprout leaves). This indicates that seedlings are ready for transplanting.
2. Preparing the Seedlings
Acclimatization: Gradually introduce your seedlings to the outside environment. Start by opening the containers for a few hours a day, gradually increasing the time over a week. This process is known as hardening off and helps seedlings adjust to direct sunlight, wind, and varying temperatures.
Moisture Check: Ensure the soil in the containers is moist before transplanting. Dry roots can stress the plants.
3. Choosing the Right Spot
Sunlight and Soil: Consider the light and soil requirements of your plants. Some might need full sun, while others thrive in partial shade.
Spacing: Give each plant enough room to grow. Refer to the seed packet or a gardening guide for specific spacing requirements.
4. Transplanting Process
Soil Preparation: Loosen the garden soil and add compost or other organic matter to give your seedlings a nutrient-rich start.
Gentle Removal: Carefully remove the seedlings from the containers. If roots are tangled, gently tease them apart but try to keep as much soil around the roots as possible.
Planting: Make a hole in your prepared soil slightly larger than the root ball of your seedling. Plant each seedling in its designated hole at the same depth it was growing in the winter-sown container. Space the plants according to their recommended spacing on seed packets. Fill the hole with soil and gently press around the base of the plant to eliminate air pockets.
Water Immediately: After planting, water the newly transplanted seedlings thoroughly. This helps settle the soil and ensures good contact between the roots and the surrounding soil.
5. Post-Transplant Care
Regular Watering: Keep the soil consistently moist but not waterlogged for the first few weeks after transplanting.
Mulching: Apply a layer of mulch around the base of the plants to retain moisture and regulate soil temperature. This is particularly beneficial during the early stages of growth.
Protection: If unexpected frost is forecasted, cover the seedlings with a frost cloth or similar protection at night.
6. Monitoring Growth
Watch for Stress: If young seedlings appear wilted or discolored, they may be experiencing transplant shock. Ensure they have enough water and shade if necessary.
Fertilization: After a few weeks, consider a gentle fertilization if growth seems slow. Remember to use natural or organic fertilizers.
Remember that transplanting can be a delicate process, so handle the seedlings with care. With proper attention and care, your winter-sown plants should thrive and contribute to a successful growing season.
The Benefits of Winter Sown Seedlings
1. Natural Cold Stratification:
Winter sowing takes advantage of the natural cold stratification process that many plant seeds require for germination. In nature, seeds go through a period of cold temperatures before sprouting, and winter sowing mimics this process. This is particularly beneficial for seeds of perennial plants, certain flowers, and native species that have evolved to germinate best after exposure to winter cold. By utilizing this natural cycle, gardeners can promote more robust and successful germination without the need for artificial refrigeration.
2. Cost-Effective and Eco-Friendly:
Winter sowing is a cost-effective gardening method. Instead of investing in indoor seed-starting equipment and heating systems, gardeners can repurpose household items like milk jugs or plastic containers to create mini-greenhouses. This not only reduces the financial investment but also promotes eco-friendliness by upcycling materials that might otherwise be discarded. The simplicity of the process aligns with sustainable gardening practices, making it accessible to a wide range of enthusiasts.
3. Hardy Seedlings:
Seeds sown through the winter sowing method tend to produce hardier seedlings. The exposure to outdoor conditions gradually acclimates the plants to the local climate, resulting in stronger and more resilient seedlings. These seedlings are better prepared for the challenges of transplanting and outdoor growth. The gradual transition from the protected environment of the container to the open garden minimizes shock and stress, increasing the overall success rate of the plants.
4. Minimal Indoor Space Required:
One of the main advantages of winter sowing is that it allows gardeners with limited indoor space to participate in seed starting. Traditional indoor seed starting setups require dedicated space, adequate lighting, and temperature control. Winter sowing, however, moves the process outdoors, utilizing available yard space. This is particularly beneficial for urban or apartment dwellers who may lack the room for traditional seed starting setups but still want to grow their own plants from seeds.
5. Early Start to the Growing Season:
Winter sowing provides an early start to the growing season. By sowing seeds outdoors in containers during the winter months, gardeners can take advantage of the natural lengthening of days and increasing sunlight as spring approaches. This early start allows for a head start in plant development, resulting in earlier blooms and harvests. It is especially advantageous for gardeners in colder climates where the outdoor growing season may be shorter.
6. Low Maintenance:
Winter sowing is a low-maintenance method of seed starting. Once the containers are set up outdoors, they require minimal attention. The closed containers act as self-contained mini-greenhouses, trapping moisture and creating a suitable environment for germination. While periodic checks for moisture are necessary, the overall hands-on involvement is much lower compared to traditional indoor seed starting. This makes winter sowing an attractive option for busy gardeners or those who may not have the time for intensive seed starting activities.
Winter sowing is an excellent method for starting a variety of perennial flowers and hardy annuals. These plants are well-suited to the cold stratification process and can thrive when started using this technique. Here are some popular choices:
Conclusion
Winter sowing is a reminder that the garden is not a static canvas but the mysteries of the changing seasons. It whispers to us that growth, resilience, and beauty are not confined to the warmth of summer alone. Instead, they can be coaxed from the winter shadows, revealing a garden that is as diverse and resilient as the seeds we sow.
In the final chapters of this cold-weather gardening tale, the gardener reaps the rewards of their patience and care. The early harvest of spinach, the vibrant hues of chard, and the promise of a garden awakening. All bear witness to the magic unlocked through winter sowing.
As we close this chapter on the enchantment of cold-weather gardening, let us carry forward the lessons learned from winter sowing. It is a reminder that, even in the harshest of seasons, there is a hidden world of potential and growth that we can uncover. So, let the magic of winter sowing efforts inspire your garden, and may the seeds you sow weave a story of resilience, and the timeless beauty of nature.
Happy winter sowing!
FAQs
Is Winter Sowing Worth It?
Winter sowing is worth it for many gardeners, especially those who want an early start on the growing season without the need for indoor space or additional equipment. It's a cost-effective and low-maintenance method that allows cold-stratification, promoting better germination for certain seeds.
Which Soil to Use for Winter Sowing:
Use a well-draining and sterile seed starting mix for winter sowing. Avoid using regular garden soil as it can compact and hinder seedling growth. A mix with a good balance of peat moss, vermiculite, and perlite is often suitable.
Can You Winter Sow Tomatoes?
Tomatoes are not typically winter-sown outdoors because they are warm-season crops. However, you can start tomato seeds indoors several weeks before the last expected frost date in your area to have healthy seedlings ready for transplanting into the garden.
Where to Place Your Winter Sowing Containers:
Place your winter sowing containers in a location that receives natural light, such as a south-facing area. This allows the seeds to experience temperature fluctuations and natural light cycles. Protect the winter sown containers from extreme conditions and monitor them regularly.
Can you winter sow directly into the ground?
While winter sowing is typically done in containers, some seeds can be directly sown into the ground in late fall or early winter, allowing them to naturally stratify during the colder months. However, not all plants are suitable for this method, so it's essential to consider the specific requirements of each seed.